

OS Deployment and PXE Boot Issues
This page covers CapaInstaller OS Deployment (OSD) and PXE boot problems that have been seen in real installations.
Solution 1 - Bad password when you sign in to the OSD GUI
Section titled “Solution 1 - Bad password when you sign in to the OSD GUI”If you get a bad password error when you sign in to the OSD GUI while deploying a computer:
- In the CapaInstaller Console, go to System Administration.
- Right-click Administrators and select Properties.
- Link the user group that is already assigned again.
You can sign in to the OSD GUI and PXE boot the computer.
Solution 2 - Secure Boot Violation, Invalid signature detected
Section titled “Solution 2 - Secure Boot Violation, Invalid signature detected”If you get this error when you PXE boot a computer:
Secure Boot ViolationInvalid signature detected. Check Secure Boot Policy in Setup.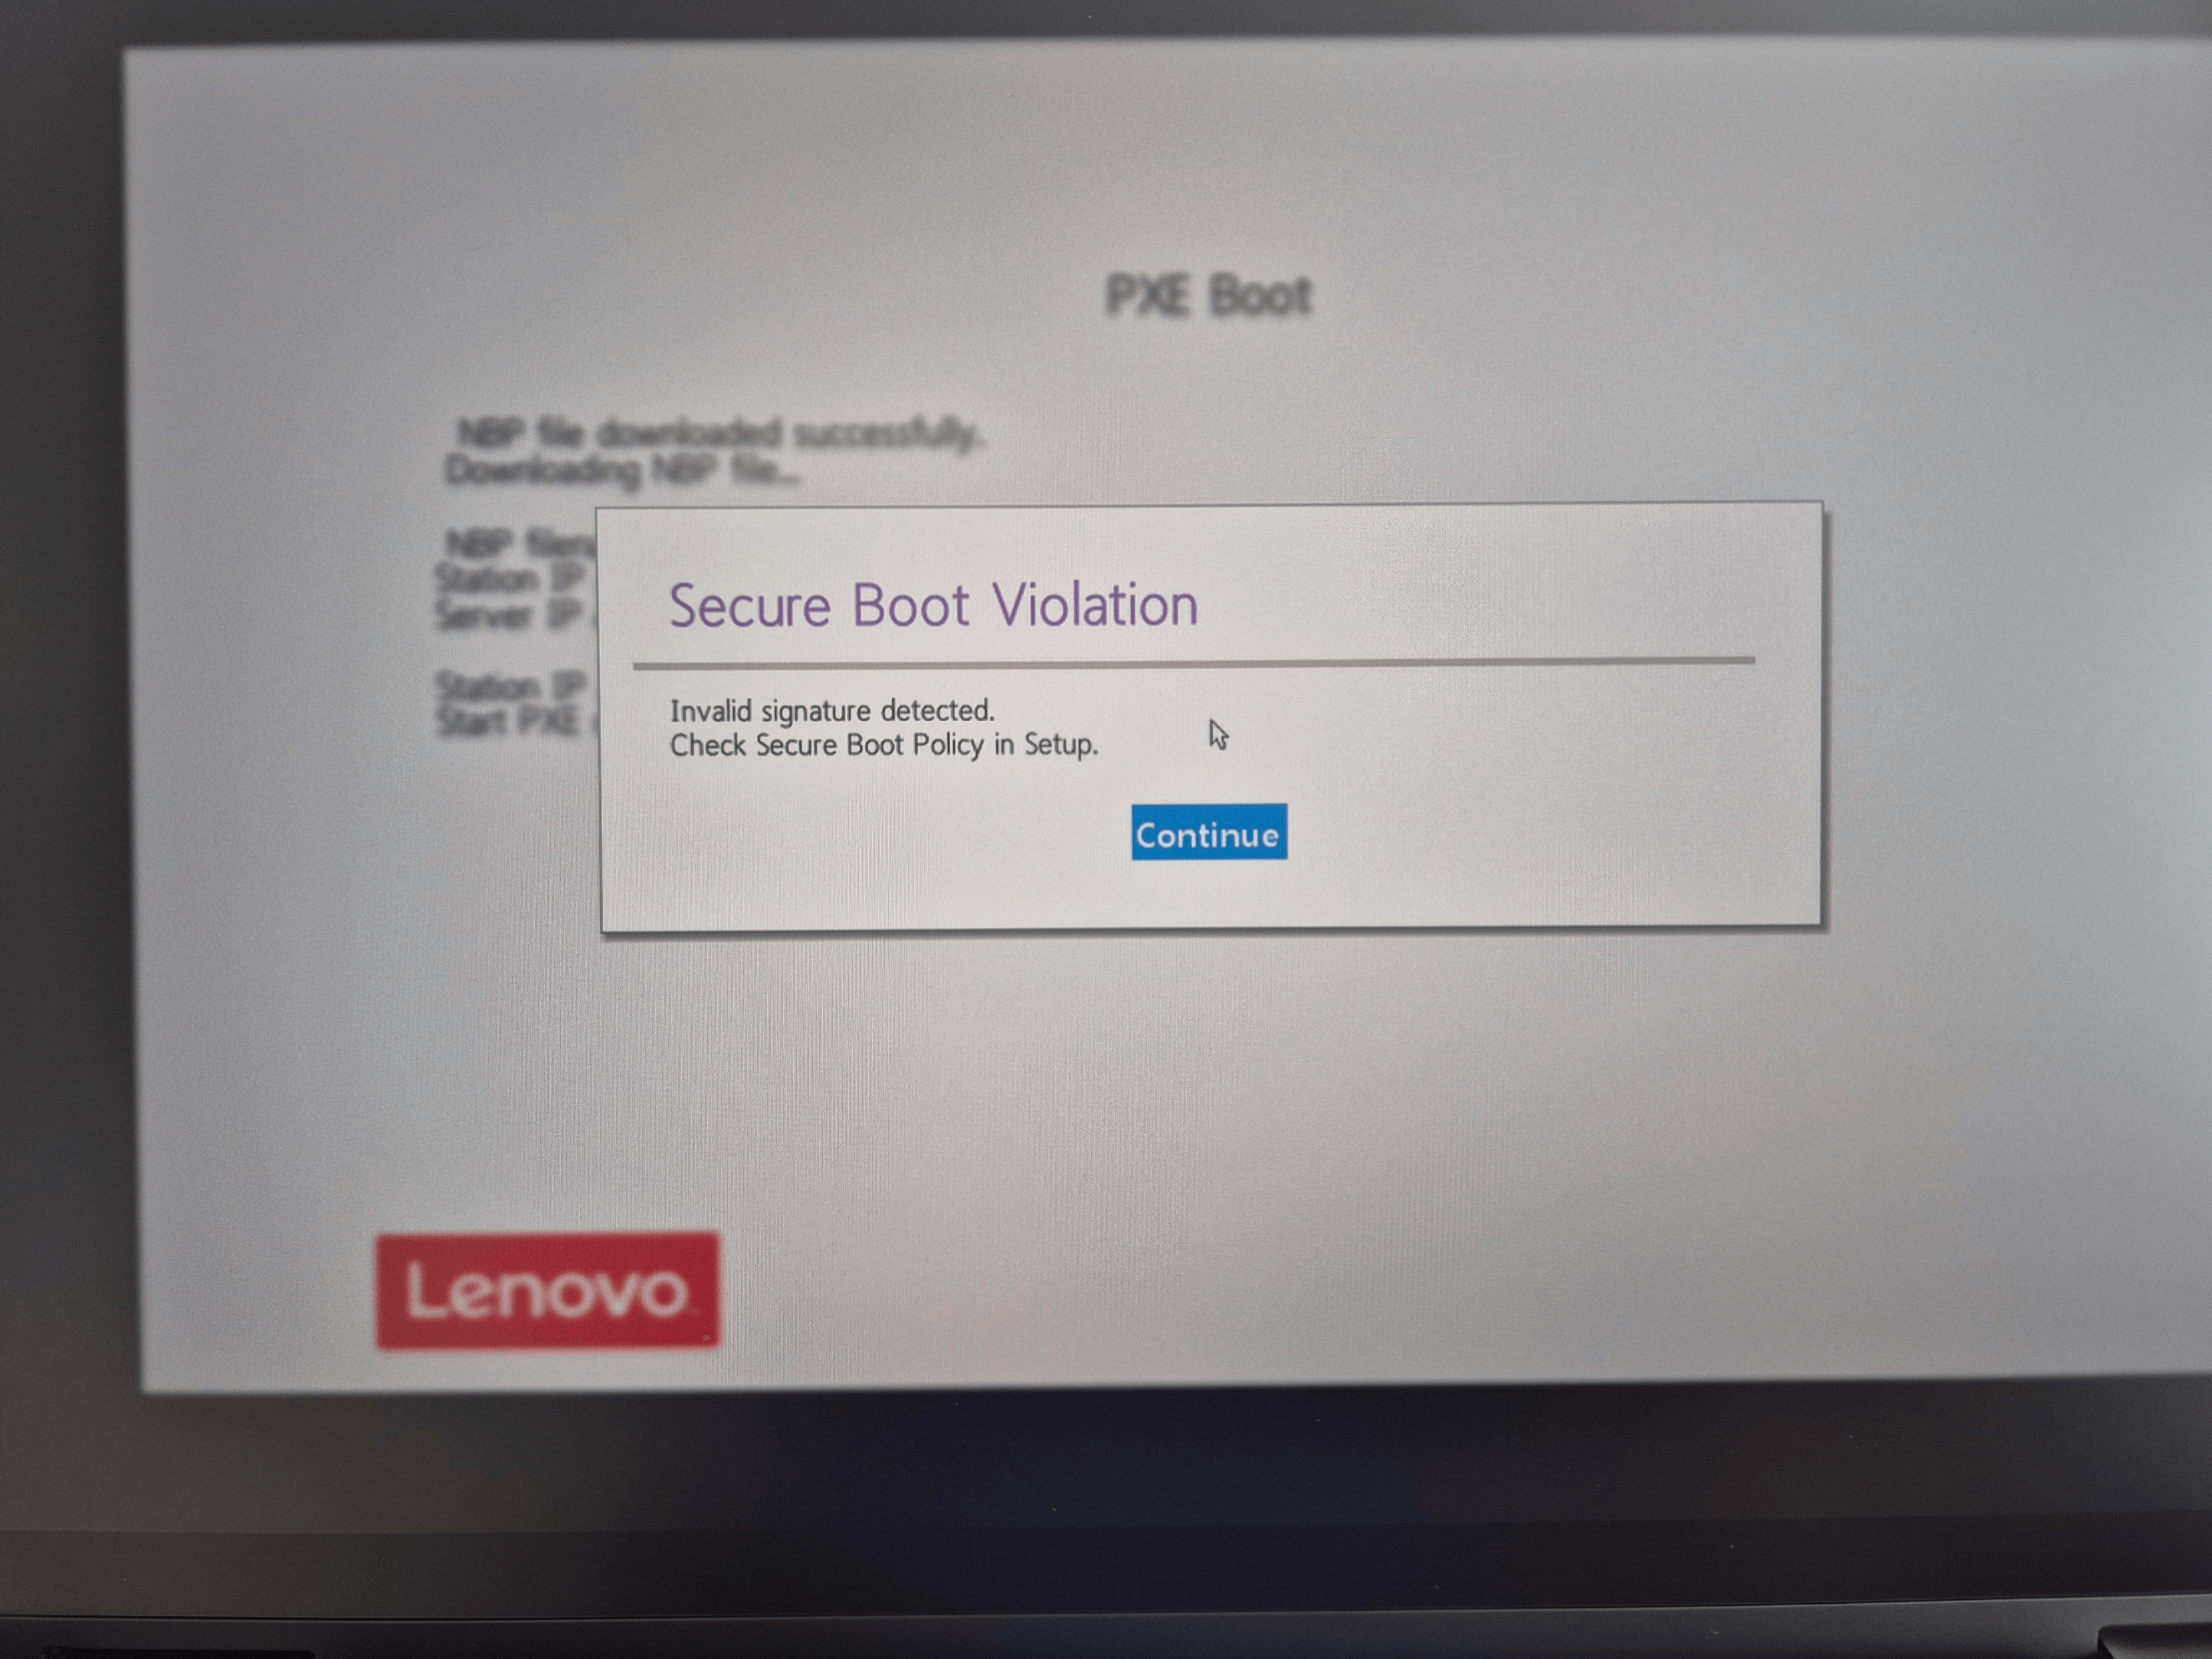
Update the boot file to the one from the current Windows ADK:
- Download the Windows ADK and the Windows PE add-on from Download and install the Windows ADK.
- Uninstall the old Windows ADK.
- Install the new Windows ADK and the Windows PE add-on.
- Copy
C:\Program Files (x86)\Windows Kits\10\Assessment and Deployment Kit\Windows Preinstallation Environment\amd64\Media\EFI\Boot\bootx64.efito\\ciBoot\Boot\efiboot\amd64on the CapaInstaller server. - Also add the copied
bootx64.efitoEFI.zipin the same folder.
Solution 3 - HP computers return to the BIOS during PXE boot
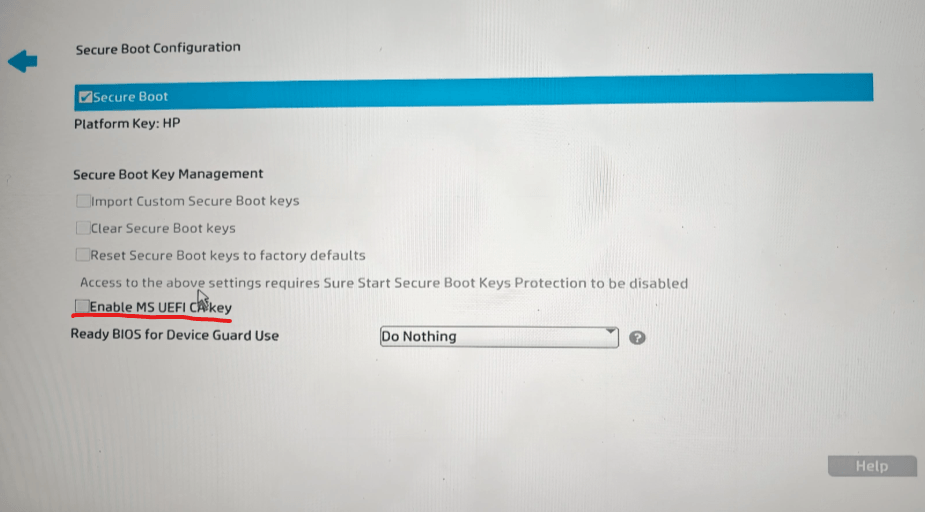
Section titled “Solution 3 - HP computers return to the BIOS during PXE boot”On newer HP laptops, if the Enable MS UEFI CA key option is turned off, the computer doesn’t accept Microsoft-signed boot files. The computer returns to the BIOS right after it gets an IP address during PXE boot.
- Open the BIOS setup.
- Go to Secure Boot Configuration.
- Make sure that Secure Boot and Enable MS UEFI CA key are both selected.
Solution 4 - Error when you create a new boot.wim on the CapaInstaller server
Section titled “Solution 4 - Error when you create a new boot.wim on the CapaInstaller server”If you get an error when you create a new boot.wim on the CapaInstaller server, create it from a Windows 11 client instead:
- Install the Windows ADK and the Windows PE add-on on a Windows 11 client.
- Install and open the CapaInstaller Console on the same client.
- Make a copy of the old
boot.wim. It’s in the ciboot share on the CapaInstaller server, for exampleD:\OSD\Boot\amd64. - If no drivers are shown in the boot image builder, run the registry files in Fix No Drivers shown in Build boot wim.zip. They restore the default Windows file association for
.infdriver files. - Create the new
boot.wimfrom the Windows 11 client.
Solution 5 - CapaOne agent on the same server blocks PXE boot
Section titled “Solution 5 - CapaOne agent on the same server blocks PXE boot”If the CapaInstaller PXE server also has the CapaOne agent installed, the CapaOne agent can hold the PXE ports (UDP 67, 69, and 4011). CapaInstaller’s PXE service then can’t answer boot requests.
- If the server is only a CapaInstaller PXE server, uninstall the CapaOne agent from it.
- If you need both products, move the CapaInstaller PXE server role to a separate server.
Solution 6 - The OSD service has lost its permissions on the ciBoot folder
Section titled “Solution 6 - The OSD service has lost its permissions on the ciBoot folder”If the OSD service loses its permissions on the ciBoot share, clients can’t download the boot
file. This happens even when the PXE and DHCP configuration is correct.
- In the CapaInstaller Console, go to Tools → Options → OS Deployment → Security.
- Click Reapply.
- PXE boot the client again.
Solution 7 - Test PXE from the server before you test a client
Section titled “Solution 7 - Test PXE from the server before you test a client”Before you troubleshoot a client, check that the PXE server answers boot requests. Use the PXE tester on the CapaInstaller server.
- Open the PXE tester on the CapaInstaller server.
- Select the server’s own IP address and network interface. Don’t select another adapter or a virtual NIC on the server.
- Run the test.
If the test succeeds, the PXE server works. If PXE boot still fails, the problem is between the server and the client. Connect the client to the switch with a network cable, then PXE boot it again. Docking stations and USB-to-Ethernet adapters don’t always support PXE boot.
Solution 8 - The deployed computer starts WinPE again instead of Windows
Section titled “Solution 8 - The deployed computer starts WinPE again instead of Windows”If OS Deployment completes but the computer restarts into WinPE instead of the new Windows installation, the BIOS doesn’t start from the Windows Boot Manager entry that OSD created.
- Open the BIOS setup.
- Reset the BIOS settings to the manufacturer’s defaults.
- Restart the computer.
The computer starts the new Windows installation.
Solution 9 - WinPE reports a missing network driver
Section titled “Solution 9 - WinPE reports a missing network driver”If the computer PXE boots into WinPE but WinPE reports that a network driver is missing, the boot image doesn’t include the NIC driver for that hardware model. This is common on new models.
Add the NIC driver to boot.wim. See
How to Add a NIC Driver to boot.wim for PXE Boot Failures.
Solution 10 - WinPE can’t find the disk or network on several models after a boot image rebuild
Section titled “Solution 10 - WinPE can’t find the disk or network on several models after a boot image rebuild”You rebuild boot.wim with Boot Image → Create Boot File…, and the console reports no errors. Then new devices start MiniSetup (WinPE) but can’t see the disk or the network. This can happen on more than one hardware model, even after you add the storage and network drivers to the boot image.
A common cause is the Windows ADK on the computer that builds the boot image. More than one Windows ADK version is installed, or the Windows PE add-on doesn’t match the installed ADK version. The console can still build a boot image without an error.
- On the computer that builds the boot image, open Settings → Apps → Installed apps (or Programs and Features).
- Check the installed Windows Assessment and Deployment Kit and Windows Assessment and Deployment Kit Windows Preinstallation Environment Add-ons entries. There must be exactly one of each, and both must have the same version.
- If you find more than one ADK version or a version mismatch, uninstall all Windows ADK and Windows PE add-on entries, then restart the computer. See OSD - Installation of Windows ADK and WINPE.
- Install one Windows ADK and the Windows PE add-on of the same version, from Download and install the Windows ADK.
- Create the boot file again. Under Additional Drivers, add the storage driver and the network driver for the new models. For example, devices with Intel VMD need the Intel RST VMD driver (
iaStorVD.inf). See How to Add a NIC Driver to boot.wim for PXE Boot Failures. - Click Update servers, then PXE boot the device again.
WinPE finds the disk and the network, and the deployment continues.
If WinPE still can’t see the disk, check the storage mode in the computer’s BIOS setup. When the storage controller is set to RAID (Intel RST/VMD), WinPE only sees the disk if the boot image has the Intel RST VMD driver from step 5. Add the driver, or change the storage mode to a non-RAID mode, such as AHCI.
Solution 11 - Windows has no network after deployment because CapaDrivers found no driver pack
Section titled “Solution 11 - Windows has no network after deployment because CapaDrivers found no driver pack”The deployment finishes, but Windows can’t find the network adapter at first boot. The agent then can’t connect, and the deployment can’t continue. With a USB network adapter, the computer gets drivers and continues.
CapaDrivers didn’t find a driver content package for the model. CapaDrivers matches the model on the identifiers that the computer reports, such as manufacturer, SMBIOS model name, and system SKU. If the vendor names its driver pack differently, nothing matches, and no drivers are copied.
- Find the OS Deployment logs of the deployment. The log location is set in the console under Tools → Options → OSD Client installation logs.
- Open
PreDriverCopy Script.Standard.logandPreDriverCopy.log. Check whether aCP CapaDrivers …content package was found and downloaded for the computer. - If no content package was found, contact CapaSystems Support with the logs and the computer’s manufacturer, model name, and system SKU. CapaSystems adds the model to the CapaDrivers catalog.
- Wait until the CapaSystems Services Cloud Updater package has run on the server. It downloads the updated catalog, and it usually runs every day. To get the catalog right away, set the package to Waiting on the server, and wait until the installation has completed. Until the catalog is updated, you can add the drivers in a custom driver content package.
- Deploy the computer again.
Windows finds the network adapter at first boot, and the deployment continues.
Solution 12 - “Verify that the os deployment service is running” at a remote site
Section titled “Solution 12 - “Verify that the os deployment service is running” at a remote site”A device at a site with its own OS Deployment Service fails to deploy with this message:
Verify that the os deployment service is running!The OS Deployment Service log, ciOSD.log in C:\Program Files\CapaInstaller\Logs\Services,
repeats lines like these:
Public Key returned a blank response.REST: GetItem<T>(...) Rest call failed. Expected a NonuniqueDTO object, from url https://<server>/cibackend/noneuniqueuuidlistREST: Verify the backend service is running and the ciBackEnd servername and port number is correct!The OS Deployment Service can’t get a valid response from the Back-end Service that it’s linked to. That Back-end Service often runs on the main CapaInstaller server, not at the remote site. Fix the existing Back-end Service before you deploy a new one.
- On the remote OS Deployment server, open the URL from the log, for example
https://<server>/cibackend, in a browser. - If the URL doesn’t respond, restart the Back-end Service. Then restart the OS Deployment Service at the remote site.
- If the URL still doesn’t respond, check the certificate. In System Administration, right-click the Back-end Service, select Service settings…, and open the Communication tab. Check Expires on. See How to test certificates.
- If the certificate has expired or was replaced, select the current certificate and use Apply Certificate Update to for all services that use it. Then restart the services again. See Back-end Service.
When the URL responds, deploy the device again.
Solution 13 - WinPE can’t see the internal disk in RAID On / Intel VMD mode
Section titled “Solution 13 - WinPE can’t see the internal disk in RAID On / Intel VMD mode”The deployment hangs at step 7, Apply disk Configuration, often on a line like
shrink desired=15000. Or WinPE reports no disk, or it partitions a USB stick instead of the
internal disk.
The storage controller is set to RAID On (Intel RST/VMD), and the boot image doesn’t include
the Intel RST VMD driver (iaStorVD.inf). Many current models use this mode by default. To
confirm, check which disks WinPE found in step 6 of OSDClient.log. See
Reading OSDClient.log.
- Add
iaStorVD.inffrom the vendor’s driver pack for the model to the boot image under Additional Drivers. - Create the boot file again, and click Update servers.
- Remove USB sticks, SD cards and other removable storage from the device.
- PXE boot the device and deploy it again.
WinPE finds the internal disk, and the deployment continues past step 7.
Solution 14 - Windows shows a Recovery screen after the deployment finished
Section titled “Solution 14 - Windows shows a Recovery screen after the deployment finished”The deployment finishes, but when the device starts Windows, it shows a blue Recovery screen
(“Your PC/Device needs to be repaired”) or a black Windows Boot Manager screen with an error
code, for example 0xc0430001.
Check the end of OSDClient.log in the Client log folder. If it contains this line, the WinPE
phase finished:
Inf Deployservice_Done: OS Deployment Done!The problem is then in Windows start-up, not in WinPE. Don’t try to fix it by adding drivers to the boot image or by changing the BIOS storage mode.
- Collect the logs and details listed in What to collect first.
- Take a photo of the error screen.
- Contact CapaSystems Support with the logs, the photo, and the details.