

Images
The following is a description of how to add images to CapaInstaller OSD and promote them. You can add an image in two ways:
- Create CapaImage… downloads a ready-made Windows image from the CapaSystems image repository. See Create a CapaImage.
- Add Windows image… adds an image you have captured yourself, as described below.
The supported images are based on the Windows Image format (.wim).
Download a CapaImage
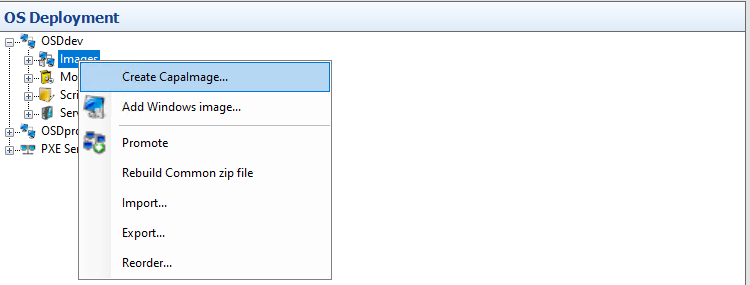
Section titled “Download a CapaImage”Right-click Images on the root OS Deployment point and click Create CapaImage… to choose a Windows version, edition and language from the CapaSystems image repository. The image is downloaded, unpacked and added to Images on the root point, ready to use. This requires internet access. See Create a CapaImage.
Add a captured image
Section titled “Add a captured image”- In the OS Deployment tree, expand the root OS Deployment point, right-click Images, and then click Add Windows image….
- Browse for the image file in your Captures folder.
- The folder is by default located in your root OSD Point.
- If you want to use the file name as the image name or description, you can select the name and copy it to the clipboard.
- Specify the name of the image and an optional description of the image.
- Select the operating system that the image was captured from.
- Click OK and wait a couple of minutes for the addition to complete. Transfer speeds depend on network and disk speeds.
Right-click options
Section titled “Right-click options”Right-clicking an image gives you the following options:
| Option | Description |
|---|---|
| Promote | Lets you promote the items on the CapaInstaller OS Deployment Point to a child point. This option is only available if a child point has been created. Click Next to promote the image to the child Deployment Point. |
| Server assignment | Selects the OS Deployment servers that the image is available on. |
| Open in Windows Explorer | Opens the image folder on the OS Deployment point. |
| Export | Exports the image to a zip file. See Use Export in OS Deployment. |
| Delete | Lets you delete the image. You are asked to confirm this. |
| Properties | Displays the properties for the image: name, description, file name and operating system. |

Right-clicking the Images node gives you the following options:
| Option | Description |
|---|---|
| Create CapaImage… | Downloads a ready-made Windows image from the CapaSystems image repository. See Create a CapaImage. |
| Add Windows image… | Adds a captured image. See Add a captured image. |
| Promote | Promotes the images to a child point. |
| Rebuild Common zip file | Rebuilds the common zip file for the images. |
| Import… | Imports images. See Use Import in OS Deployment. |
| Export… | Exports images. See Use Export in OS Deployment. |
| Reorder… | Changes the order of the images. |