# Agent Can't Connect
> Fix an agent that will not connect to PerformanceGuard even though the computer is otherwise online.
Source: https://docs.capaone.com/performanceguard/troubleshooting/troubleshoot-agent/agent-can-t-connect/
Product: PerformanceGuard — a separate CapaSystems product; do not apply this page to any other.
Use this information if the PerformanceGuard agent on a computer won't connect to the PerformanceGuard system even though the computer is otherwise online.
:::caution
You can only do this if you're a PerformanceGuard administrator.
:::
When that's the case, the computer never appears when you search for it in the PerformanceGuard web interface (**ANALYZE > Computers > Computer Search**). Alternatively, it does appear, but with a yellow or red status.
# **How It Should Work**
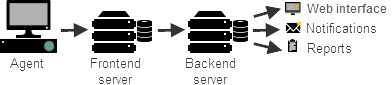
When everything works correctly, the agent should connect to the PerformanceGuard Frontend server. The Frontend server in turn sends the agent's data to the PerformanceGuard Backend server, which in turn lets you view the data in the PerformanceGuard web interface, in reports, and through e-mail notifications.
# **Possible Cause**
The most likely reason why the agent isn't able to connect is that the agent isn't configured to use the correct IP address and port number of the PerformanceGuard Frontend server.
Another reason may be that a network problem or firewall prevents the computer that has the agent installed from connecting to the Frontend server.
In the following we will check that the agent has the correct information about the Frontend server. If required, we will also check the connection between the computer that has the agent installed and the Frontend and Backend servers.
# **Verification**
You can use this verification method if the computer that has the agent installed has previously been in contact with the Frontend server — in other words: If you have previously been able to see the computer when you searched for it in the PerformanceGuard web interface.
If you have never been able to see the computer in the PerformanceGuard web interface, simply go to *Solution* section in the following.
1. On the computer that has the agent installed, open a browser and connect to *http://localhost:4007*.
:::caution
4007 is the default port number. If the port number has been changed in your organization, PerformanceGuard administrators can view it in the PerformanceGuard web interface: Select **ADMINISTRATION > Agent Configuration > Configurations**, click the **Edit** link next to the agent configuration group that the agent belongs to, select the **Agent Configuration** tab, scroll down to **Agent Service Parameters** section and look for the **Web Server TCP port** number.
:::
2. In the agent information window that opens, select **View > Configuration**.
3. In the agent configuration table, look for the **Frontend IP** and **Frontend Port** values. These values must reflect the IP address of the required Frontend server and the port number on which the Frontend server listens for data from agents (by default port 4001).
# **Solution**
Option 1:
On the computer that has the agent installed:
1. Select /**Start**, type *services.msc* and press ENTER. Then stop the PerformanceGuard Agent service.
2. Open Windows' Registry Editor (click **Start**, type *regedit* and press ENTER) and expand the key *HKEY\_LOCAL\_MACHINE\SOFTWARE\PremiTech\E2EAgent*.
3. Edit the values of the *backendip* and *backendport* parameters so that they reflect the IP address of the required Frontend server and the port number on which the Frontend server listens for data from agents.
:::caution
Yes, it's correct that you should edit the registry's *backendip* and *backendport* parameters. Despite their names, it's those parameters that the agent uses to communicate with the Frontend server.
:::
:::note[Important]
The values are correct. What should I do?
In that case there is probably a network problem or firewall that prevents the computer that has the agent installed from connecting to the Frontend server. Start the agent service as described in the next step and then continue to *Test Frontend and Backend Server Connections* in the following.
:::
4. Select /**Start**, type *services.msc* and press ENTER. Then start the PerformanceGuard Agent service. The agent should now be able to communicate with the Frontend server, and it should after some minutes show up if you search for it in the PerformanceGuard web interface. If not, verify the agent's communication with the Frontend and Backend servers as described in the following.
Option 2:
1. Remove the agent.
2. Install the agent with correct Frontend server parameters.