# Upgrade Version 6.6 - 7.0
> Prerequisites and steps for upgrading PerformanceGuard from version 6.6 to version 7.0.
Source: https://docs.capaone.com/performanceguard/installation/install-performanceguard-server-8-1-or-newer/upgrade-version-7-0-or-newer-to-version-7-6/upgrade-version-6-6-7-0/
Product: PerformanceGuard — a separate CapaSystems product; do not apply this page to any other.
:::tip
Before you upgrade PerformanceGuard, make sure that you know the [Hardware Recommendations](/performanceguard/installation/install-performanceguard-server/hardware-recommendations/) and [Software Requirements](/performanceguard/installation/install-performanceguard-server/software-requirements/).
:::
# **Important Prerequisites**
It's important to be aware of the following before you begin the upgrade process:
- You must have administrative rights on the computer that you are going to perform the upgrade on (local administrator).
- The new version of PerformanceGuard may require a different Java JDK and/or Microsoft .NET Framework version than your old one. If the new PerformanceGuard version requires a different JDK and/or .NET Framework version, it is important that you install the required JDK and/or .NET Framework version on the PerformanceGuard server before you install the new version of PerformanceGuard. See also [Software Requirements](/performanceguard/installation/install-performanceguard-server/software-requirements/) and [Software Requirements](/performanceguard/installation/install-performanceguard-server/software-requirements/).
- You should install the new version at the same location as the one you are upgrading. Make a note of the location that PerformanceGuard is currently installed at.
- If you use SQL Server authentication, passwords for the databases must follow the password policy for the SQL Server that you use.
:::tip
View [**Microsoft's SQL Server password policies**](http://msdn.microsoft.com/en-us/library/ms161959(v=sql.110).aspx) (link applies for SQL Server 2012, but you can select other SQL Server versions on the page).
:::
- You can download the server installer for the latest PerformanceGuard version. You can download the server installer for the latest PerformanceGuard version from the [Current Release of Performance Guard](..\..\..\..\..\PerformanceGuard%20Public\PerformanceGuard%20Home\PerformanceGuard\Download\Current%20Release%20of%20Performance%20Guard.md).
## **If You Want to Upgrade a PerformanceGuard Installation that Uses Windows Authentication**
If your current PerformanceGuard installation uses Windows authentication for some or all of its services, perform steps 1-5 in the following, but note that during step 5 you should also specify the Windows account(s) that should run the required service(s). Read more details about this under step 5.
# **Step 1: Stop PerformanceGuard Services**
Select  /**Start**, type services.msc and press ENTER. Then stop these services:
- PerformanceGuard Backend Server
- PerformanceGuard Frontend Server
- PerformanceGuard Web Server
# **Step 2: Back Up PerformanceGuard Databases**
Back up your PerformanceGuard frontend and backend server databases before you upgrade your PerformanceGuard installation. Having a backup is important in the unlikely case that something goes wrong during your upgrade.
See [Back Up Database](/performanceguard/administration/more-setup/back-up-database/) for more information.
# **Step 3: Back Up Current PerformanceGuard Installation**
Back up all of the content of the following folders in your current PerformanceGuard installation, including subfolders:
- \[PerformanceGuard installation folder\]\collector
- \[PerformanceGuard installation folder\]\display
- \[PerformanceGuard installation folder\]\notification
- \[PerformanceGuard installation folder\]\reports
# **Step 4: Install New Version of PerformanceGuard**
:::tip
Remember to update the *msiproperties* file in the installation folder of PerformanceGuard i.e. C:\Program Files\PerformanceGuard\msiproperties.properties before upgrading. This implies to you only if you have changed any parameters e.g. port no, password, database's connection URL etc. These changed parameters must reflect the parameters in the *msiproperties* file.
:::
1. Start an elevated Windows command prompt and navigate to the folder that contains the installer for the new PerformanceGuard version.
:::note[Important]
What's an elevated command prompt?
It is a command prompt that's able to execute commands with administrative privileges. To get an elevated command prompt, click  /**Start**, type *cmd*, right-click **Command Prompt** in the search results, and select **Run as administrator**.
:::
2. Start the installation with the following command:
```powershell
msiexec /i PerformanceGuard.msi /L*v! installLog.txt
```
The /L\*v! parameter in the command makes sure that the installer records a log file of the installation. In this case the log file will be called installLog.txt. The log file will be available at the location from which you run the installation, so if you run the installation file from C:\, the log file will be placed under C:\ too.
:::caution
PerformanceGuard is by default installed in C:\Program Files\PerformanceGuard. If your old PerformanceGuard installation was installed at another location, for example on the D: drive, it is important that you specify the location that your require, otherwise your new PerformanceGuard version will be installed at the default location on the C: drive.
:::
To install PerformanceGuard at a location other than the default C:\Program Files\PerformanceGuard, add an INSTALLFOLDER parameter to the command, like in the following example where PerformanceGuard is going to be installed on the D: drive:
```powershell
msiexec /i PerformanceGuard.msi /L*v! installLog.txt INSTALLFOLDER="D:\PerformanceGuard"
```
If you are installing on a Windows Server CORE (a type of server that doesn't have a graphical user interface), add the following to the command:
```powershell
"\q"
```
When the installer open window opens, click **Next**.
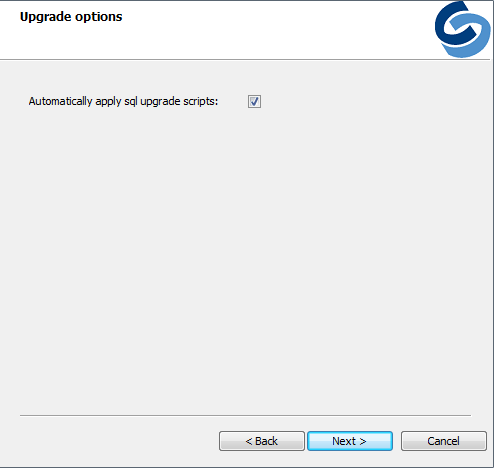
3. Make sure that **Automatically apply SQL upgrade scripts** is selected. When ready, click **Next**.
:::caution
If you clear the **Automatically apply SQL upgrade scripts** box, you must upgrade the PerformanceGuard databases yourself. This is generally not recommended, but some advanced users prefer to be able to do this themselves. If you prefer to upgrade the databases manually, make sure that you know the database user names and passwords as well as the system administrator (sa) password for the SQL Server(s) in question.
:::
4. Specify settings for the PerformanceGuard web server: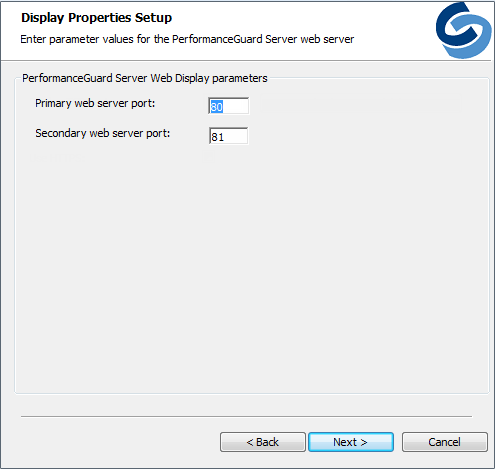
- **Primary** and **Secondary web server port**: PerformanceGuard has a web server service that runs the PerformanceGuard web interface. The web server needs to use two TCP ports. Make sure that no other applications use those ports.
:::tip
When you move on, the installer automatically checks the availability of the ports that you specify.
:::
:::tip
If you run into problems with port 80, see the troubleshooting article **[Port 80 Is Used by Another Service](/performanceguard/troubleshooting/troubleshoot-server/port-80-is-used-by-another-service/)**.
:::
- **Use HTTPS**: By default, the PerformanceGuard web server will use non-secure HTTP transfer, because it's typically fine for communication over a LAN, and because it uses fairly few CPU resources. If required, you can select to use the more secure HTTPS to protect your communication against eavesdropping and man-in-the-middle attacks, but be aware that HTTPS uses more CPU resources than HTTP.
:::caution
If you configure the PerformanceGuard web interface to use HTTPS connections, the web interface is by default installed with a self-signed server certificate. Communication between web browsers and the web interface will be encrypted with SSL, but browsers will complain that the certificate isn't trusted. To resolve this security issue, you must install your own server certificate that's signed by a trusted authority (such as VeriSign or Symantec). See **[SSL Server Certificate for HTTPS](/performanceguard/installation/install-performanceguard-server/ssl-server-certificate-for-https/)**. The information in that topic is important even if you used HTTPS on your old installation: Your old PerformanceGuard version may only have used one web server port, whereas the new version will use two. That's why it's important that you go through procedure described in the topic to verify that both of your new installation's web server ports will be covered by HTTPS. It's OK to complete the installation of the new PerformanceGuard version before you verify your HTTPS setup.
:::
When ready, click **Next**.
5. Click **Install**.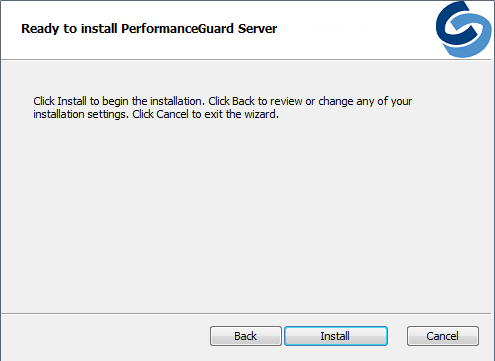
6. When installation is complete, click **Finish**.
## **Installation Troubleshooting**
If something goes wrong during your installation, you'll see an error message. The error message will typically tell you that:
- the setup wizard ended prematurely, and
- that your system has not been modified
The latter is not always true. Your system may in fact have been modified, even if the error message tells you that it hasn't. Sometimes the entire PerformanceGuard system, including databases, may in fact have been upgraded, but if just a single of the PerformanceGuard services doesn't start after the installation has finished, the error message will appear.
You are therefore often able to solve the problem yourself.
### **What You Should Do**
If something goes wrong during your installation, you should first ask yourself if you have you met all of the prerequisites (see the beginning of this topic). For example, do you have administrative rights, and does the computer have the required version of Java JDK?
Next, you should check your installation log:
1. Open your installation log. If you followed the installation procedure in the previous, the log file is called installLog.txt. The log file will be available at the location from which you ran the installation, so if you ran the installation file from C:\, the log file will be placed under C:\ too.
2. Search the log for occurrences of **return value 3**.
3. Read the contents of the log file just before occurrences of **return value 3** to determine which actions failed during the installation. In this example (click thumbnail to view image in full size), a search for **return value 3** revealed that there were problems with the user account specified for the PerformanceGuard backend server database: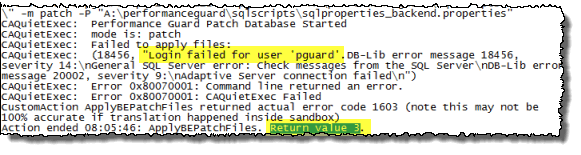
If you go through the installation log as described, you can nearly always find out what went wrong. In many cases you can solve the problem yourself. For instance, the problem identified in the example was solved simply by specifying the correct password for the backend server database.
If you need help from PerformanceGuard support, click the PerformanceGuard logo at the top of this page. That'll take you to the front page of the help system, where you can find information about your support options.
If you need help from PerformanceGuard support, you can find information about your support options on the CapaSystems website, .
# **Step 5: Restore Specific Modifications**
At the end of the upgrade process you may need to re-apply certain configuration settings:
**Stop Services**
Select  /**Start**, type services.msc and press ENTER. Then stop these services:
- PerformanceGuard Backend Server
- PerformanceGuard Frontend Server
- PerformanceGuard Web Server
- PerformanceGuard Web Server 2
**Windows Authentication of PerformanceGuard Services**
:::caution
This is only relevant if your old PerformanceGuard version used Windows authentication for some or all of its services, and you also want this to work in your new version.
:::
1. While the services are stopped, right-click the required PerformanceGuard service, for example the PerformanceGuard Backend Server, and select **Properties**.
2. Select the **Log On** tab.
3. Select **This account** and specify the Windows user that should run the service.
4. Repeat for each required PerformanceGuard service.
**Reports**
Make sure that you move the content from your backup of the report folder (\\[PerformanceGuard installation folder\\]\reports) to the similar report folder in the new PerformanceGuard version. This way you'll be able to access any old reports in your new PerformanceGuard version.
**Services Memory**
The PerformanceGuard services—the Frontend server, Backend Server and Web Server services—are allocated a certain amount of memory (by default a minimum of 2048 MB and a maximum of 4096 MB).
If your previous PerformanceGuard installation used a higher maximum setting for some or all of the services, you must [Allocate More Memory to Services](/performanceguard/installation/install-performanceguard-server/allocate-more-memory-to-services/) again.
**Other Changes**
If you have made changes to the configuration of your old PerformanceGuard version, you'll need to edit the new version's configuration files. Open the configuration files in the following folders from your backup, compare them with the corresponding configuration files in your new PerformanceGuard version, and make any necessary changes to the new version's configuration files:
- \\[PerformanceGuard installation folder\\]\collector\conf
- \\[PerformanceGuard installation folder\\]\display\conf
:::caution
If you have used [SSL Server Certificate for HTTPS](/performanceguard/installation/install-performanceguard-server/ssl-server-certificate-for-https/), the ...\display\conf folder will contain a keystore file called pg.keystore. Remember to migrate that keystore file for SSL to work with your signed server certificate on the new PerformanceGuard version.
:::
- \\[PerformanceGuard installation folder\\]\notification\conf
**Start Services**
Select  /**Start**, type services.msc and press ENTER. Then start these services:
- PerformanceGuard Backend Server
- PerformanceGuard Frontend Server
- PerformanceGuard Web Server
- PerformanceGuard Web Server 2
**License**
When you access the PerformanceGuard web interface for the first time after upgrading, you must re-install your license.
Use your existing license from the backup of \\[PerformanceGuard installation folder\\]\display\conf\
:::note[Important]
Do I not need a new license for the new version?
No, as long as your existing license hasn't reached its expiry date, you can use it for the new version too.
:::
# **Strange Behavior After Upgrade?**
On rare occasions, PerformanceGuard may behave strangely after an upgrade if its cache and work folders were not cleaned up before you started the new version of PerformanceGuard. Fortunately, there's an easy solution if you experience this: See the troubleshooting topic [After Upgrade PerformanceGuard Behaves Strangely](/performanceguard/troubleshooting/troubleshoot-server/after-upgrade-performanceguard-behaves-strangely/).
# **What About PerformanceGuard Agents?**
You don't need to upgrade the PerformanceGuard agents that are installed on your organization's computers. Old agents are compatible with new versions of PerformanceGuard.
Should you wish to upgrade your PerformanceGuard agents anyway, you can download the latest version of the PerformanceGuard agent installer from the [Current Release of Performance Guard](..\..\..\..\..\PerformanceGuard%20Public\PerformanceGuard%20Home\PerformanceGuard\Download\Current%20Release%20of%20Performance%20Guard.md). Unless your existing agents are very old (version 5.x or earlier), you don't need to remove existing agents before you deploy the new version.