# Preparing a Windows Image for OSD
> Prepare a Windows operating system image for use in CapaInstaller OS Deployment.
Source: https://docs.capaone.com/capainstaller/the-capainstaller-console/os-deployment/how-to-use-osd/preparing-a-windows-image-for-osd/
Product: CapaInstaller — a separate CapaSystems product; do not apply this page to any other.
# Introduction
A simple overview of the steps involved in preparing a Windows Operation System Image for use in **CapaInstaller** Operating System Deployment
### Prepare
Prepare the deployment server for Image configuration and capturing
- **Download and Install the Windows Windows Assessment and Deployment Kit →** [**Windows Assessment & Deployment Toolkit**](https://developer.microsoft.com/en-us/windows/hardware/windows-assessment-deployment-kit)
- **Create a** [**WinPE**](https://msdn.microsoft.com/en-us/windows/hardware/commercialize/manufacture/desktop/winpe-intro) **boot image → How to** [Create a boot image](/capainstaller/the-capainstaller-console/os-deployment/how-to-use-osd/create-a-boot-image/)
- **Install a clean version of Windows on a bare metal reference computer or a virtual machine.**
### Generalize
Generalize the reference computer to prepare the image for duplication.
- **Run the SysPrep command located in C:\Windows\System32\Sysprep**
| |
|:-------------------------------------------------|
| `Sysprep.exe /quiet /generalize /oobe /shutdown` |
How to [Generalize a Windows installation](https://msdn.microsoft.com/en-us/windows/hardware/commercialize/manufacture/desktop/sysprep--generalize--a-windows-installation)
### Capture & Add
Capturing and adding an image into CapaInstaller OSD
- **Boot the reference computer and immediately press F12 to enter boot selection menu. Choose to boot from the network (PXE)**
- **Wait for the CapaInstaller boot image to load**
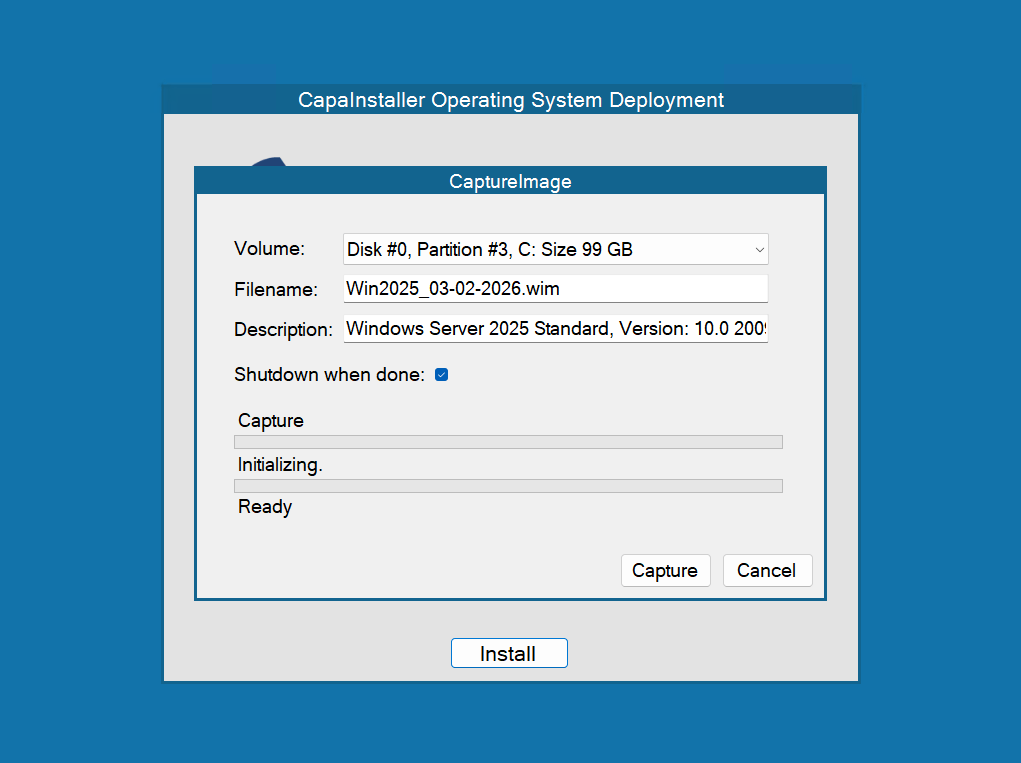
- **At the Install screen press** ***CTRL-C*** **to enter Capture Mode**
- **Make sure the volume is the C:**
- **Name the capture file**
- **Begin the Capture and wait for the capture to complete and upload to the CapaInstaller server**

- **When the Capture is complete add the image in OSD → How to Add** [Images](/capainstaller/the-capainstaller-console/os-deployment/what-is-os-deployment/images/)
The capture process illustrated. (Image capture speeds may vary depending on network and disk performance)
### Configure
Use functions from [OSD Scripting Library](/capainstaller/vb-scripting-library/osd-scripting-library/) to configure settings in the Windows Deployment answer files
- **Create a Windows/Panther folder in the Image folder on the relevant OSD Point →** ***\*****\Images\\<*****Imagename\>*****\Windows\Panther\**
- **Create a vanilla unattend.xml from the template below and place it in the new folder**
- [Create a new script](/capainstaller/the-capainstaller-console/os-deployment/how-to-use-osd/create-a-new-script/) **with the needed configuration functions**
Click here to expand unattend.xml template
:::note
``
``
``
``
``
``
:::
:::caution
When working with unattend.xml, the unattend.xml file must exist, and the root component tags must exist as shown in the template above. All elements in the components tag will be inserted or deleted by the functions.
:::
Read more
- [Sysprep functions (OSD)](..\..\..\VB%20Scripting%20Library\OSD%20Scripting%20Library\Sysprep%20functions%20(OSD).md)
- [Create your own answer file](https://technet.microsoft.com/en-us/library/dn621904.aspx)
- [Windows Deployment sample answer files](https://technet.microsoft.com/en-us/library/dn621892.aspx)